


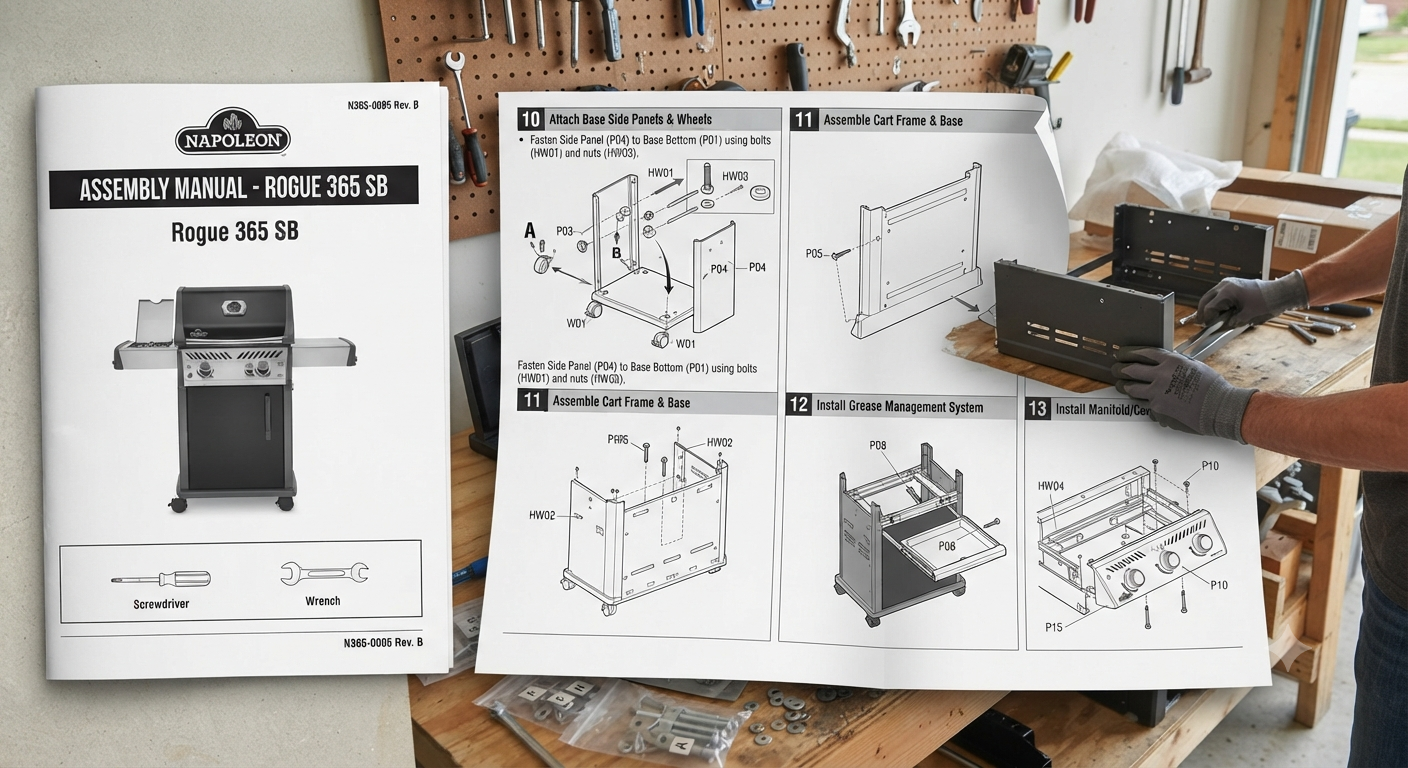
If you are searching for Napoleon 365SB assembly instructions, you are probably looking at a box full of panels, brackets, fasteners, a heavy grill head, and a side burner that makes the project seem more complicated than it really is. The trick is not speed. It is assembling the Rogue 365SB in the correct order while keeping the cabinet square and the fuel-system parts protected.
This guide breaks the job into practical stages while staying aligned with Napoleon’s documentation for the Rogue 365SB. Napoleon identifies the propane R365SBPK as a Rogue 365 with a range side burner, 365 square inches of primary cooking space, and an additional 95-square-inch warming rack.
There is one important catch. Hardware and fuel components can vary by production year, country, and propane versus natural-gas configuration. Use the diagrams and hardware callouts supplied with your exact grill as the final reference.
Before You Start the Napoleon 365SB Assembly Instructions
A good setup begins before the first screw goes into the cart.
Do not dump every hardware bag into one pile. Separate the components into logical groups: cart panels, shelf hardware, door pieces, side-burner components, cooking parts, grease-management pieces, and gas-system hardware.
Napoleon’s dedicated 365SB quick assembly guide is identified as document N415-0448, and its tool callout includes a 3/8-inch or 10 mm wrench. Napoleon also advises wearing work gloves and safety glasses during unpacking and assembly because fabricated metal edges and corners may be sharp.
Prepare:
- Work gloves and eye protection
- 3/8-inch or 10 mm wrench/socket
- Appropriate screwdriver for supplied screws
- Clean cardboard or a blanket to protect finished surfaces
- Small containers for hardware
- A second person for the heavy grill-head installation
- The model-specific Napoleon assembly guide
One useful rule applies throughout these Napoleon 365SB assembly instructions: start structural screws by hand and leave them slightly loose until adjoining panels are aligned. Tightening the first bracket completely can make the next four holes frustratingly difficult to match.
Napoleon 365SB Assembly Instructions Step 1: Confirm the Exact Model and Fuel Type
Check the rating plate before assembling or connecting anything related to gas.
The name 365SB describes the grill configuration. It does not mean every 365SB sold worldwide uses the same regulator, orifice, supply hose, or connection hardware. Napoleon documentation lists different gas-system parts for different configurations and markets.
This matters because propane and natural-gas components are not interchangeable simply because they look similar.
Never drill an orifice larger. Do not replace the supplied regulator with a random part. Do not assume another Rogue-series hose is acceptable because its threads appear to match.
For natural-gas installations, follow the regulations and instructions applicable to your particular model and location. Napoleon’s North American Rogue 365 manual states that the natural-gas connection should be completed by a licensed gas fitter and that connections must be leak-tested.
Napoleon 365SB Assembly Instructions Step 2: Build the Bottom of the Cart First
Start at floor level.
Position the bottom shelf on a protected work surface and install the caster plugs, casters, wheels, or associated hardware supplied with your production version. Napoleon’s parts documentation for the Rogue 365/365SB identifies the bottom shelf, caster plugs, and caster assemblies among the cart components.
Seat the casters fully before building the cabinet upward. If locking casters are fitted, keep their positions consistent with the model-specific diagram.
Once the base is upright, engage the caster brakes.
Why assemble the wheels now? Because trying to install them after the grill becomes heavy means tipping a partly assembled cabinet onto its side. That creates unnecessary opportunities to dent panels, scratch finishes, or twist the frame.
The foundation is simple but important. If the bottom shelf is wrong, nearly every later stage of the Napoleon 365SB assembly instructions becomes harder.
Napoleon 365SB Assembly Instructions Step 3: Install the Cart Side and Rear Panels
Fit the left and right enclosure panels to the bottom shelf. Add the rear cart panel and the appropriate internal brackets shown in your assembly diagram.
Napoleon lists separate left/right cart enclosure panels, a rear enclosure panel, pivot brackets, magnetic hardware, and bottom-shelf components for the Rogue 365/365SB cart.
Start each structural screw several turns by hand.
Do not completely tighten one side and then move to the other. Instead:
- Install all primary cart fasteners loosely.
- Check that both sides sit vertically.
- Make sure the top edges line up.
- Confirm the door opening appears square.
- Tighten opposite sides progressively.
This technique reduces accumulated alignment error.
If one screw hole seems dramatically out of position, resist the temptation to drill another hole. Loosen the neighboring panels first. A slightly twisted cabinet is usually the cause.
Step 4: Fit the Door and Door Hardware
Install the door bushings, handle, pivot or hinge points, and magnetic catch components according to your diagram. Napoleon’s parts list identifies dedicated door bushings, cart door, and door handle components for the 365/365SB.
Support the door while engaging the pivots. Do not let its full weight hang from one partially installed attachment point.
After installation, open and close it several times.
The door should move freely without scraping heavily against the bottom shelf. If it sits crooked, check whether the cabinet is square before trying to bend hinges or panels.
A common improvement to basic Napoleon 365SB assembly instructions is to make door alignment part of your frame check. Loosen the cart slightly. Square it. Recheck the door. Then tighten the cabinet evenly.
That often fixes the problem immediately.
Napoleon 365SB Assembly Instructions Step 5: Position the Main Grill Head
This is where having another person becomes valuable.
The grill body is bulky and considerably heavier than an individual cart panel. Lift from solid structural areas. Avoid lifting by the control knobs, manifold, hose, folding shelf hardware, or anything that was not designed as a carrying point.
Lower the firebox onto the cart while watching the mounting locations.
Before installing the final fasteners, look underneath and make sure:
- No gas hose is trapped.
- No ignition wire is pinched.
- The firebox is fully seated.
- Mounting holes are aligned.
- The drip-pan path remains unobstructed.
Do not compensate for badly misaligned holes by forcing a screw at an angle.
When completing this portion of the Napoleon 365SB assembly instructions, tighten the grill-body fasteners securely but avoid excessive torque from a high-powered impact driver. Sheet-metal brackets can distort or threads can be damaged when overtightened.
Step 6: Install the Standard Side Shelf
Mount the ordinary side shelf to the appropriate side of the grill using its brackets and pivot hardware.
Napoleon parts documentation identifies separate side-shelf brackets and the side-shelf assembly for the Rogue 365 family.
If your version has a folding shelf, test its movement before tightening every mounting point completely.
Raise it.
Lower it.
Engage the latch or support mechanism.
A shelf that binds at this stage probably will not improve after every screw is torqued down. Loosen its brackets slightly and let them settle into alignment.
Do not enlarge factory holes merely to make the shelf look level.
Napoleon 365SB Assembly Instructions Step 7: Assemble and Connect the Range Side Burner
This is the section that makes Napoleon 365SB assembly instructions different from ordinary Rogue 365 assembly directions.
The SB version includes the range-style side burner. Napoleon’s parts information for the model lists items including the side-burner shelf assembly, side burner, burner grate, burner lid, gas hose, ignition lead, fitting, burner orifice, and retaining clip.
First mount the side-burner shelf firmly to its support points.
Next verify that the burner and burner plate are seated in the orientation shown in the model-specific diagram. Do not connect gas until the mechanical assembly is stable.
Align the burner connection carefully
The gas orifice needs to align properly with the burner’s inlet or venturi area.
It should not enter at a severe angle. Never reshape the opening to make an incorrectly positioned connection fit.
If alignment looks wrong:
- Stop.
- Recheck the shelf position.
- Check burner orientation.
- Check the gas fitting.
- Compare everything with the factory diagram.
Only install the retaining hardware once the pieces are seated as intended.
Connect the ignition system
Attach the ignition lead where specified for the side burner. Napoleon’s Rogue 365SB parts list includes an electronic ignition lead as part of the side-burner system.
Route the lead so it does not rub against sharp metal, touch a hot component, or become trapped in folding hardware.
Finally install the side-burner grate and lid components.
Open and close the lid before moving on. Everything should operate without interference.
Napoleon 365SB Assembly Instructions Step 8: Route the Gas Hose Safely
Gas-hose routing deserves more attention than it usually gets.
Napoleon specifically warns that the supply hose must not touch high-temperature surfaces. Its documentation also warns against routing the hose underneath the drip pan and shows a retaining clip for the hose on applicable propane models.
The correct route should look relaxed rather than stretched.
Avoid:
- Sharp bends
- Kinks
- Pinched sections
- Contact with the firebox
- Contact with the drip pan
- Contact with hot surfaces
- Tension at the regulator or manifold
One of the best practical additions to the Napoleon 365SB assembly instructions is a simple underside inspection.
Before connecting the gas supply, get low enough to see the entire hose path. Trace it visually from the grill connection toward the regulator.
Now slide the drip pan completely in and out.
Nothing should rub.
That 30-second check can expose a routing problem that is nearly invisible when standing above the grill.
Step 9: Install the Drip Pan and Grease Tray
Fit the drip pan into its support guides and install the grease-tray holder and grease receptacle supplied with your version.
The Rogue 365 parts documentation identifies a drip pan, grease tray holder, and aluminum grease tray as distinct components.
The main drip pan should slide easily.
If it catches, investigate rather than forcing it. Look for:
- A protruding screw
- Bent guide rails
- Incorrect panel positioning
- A trapped hose
- Shipping material
- Misaligned grease components
Napoleon also cautions against grease buildup because accumulated grease can become a fire hazard.
Do not casually modify the grease-management system. Its job is to move grease away from the burners and into the collection area.
Step 10: Fit the Sear Plates, Cooking Grids, and Warming Rack
Now work inside the firebox.
Position the sear plates in their prescribed orientation. Napoleon’s troubleshooting guidance specifically notes that incorrectly installed sear plates can contribute to uneven heat and provides orientation guidance in the Rogue 365 manual.
Then install the main cooking grids and warming rack.
Nothing should rock excessively or rest accidentally on the burner tubes.
Although this stage of the Napoleon 365SB assembly instructions feels easy, inspect the burner area while the cooking grids are still removable.
Look for any component that shifted during shipping.
Pay particular attention to burner seating and the cross-light components between burners. Correcting a displaced piece now is considerably easier than discovering it during first ignition.
Step 11: Connect the Propane Cylinder
This section applies to compatible North American propane models. Other markets may use different cylinder and regulator systems, so follow the instructions supplied with your specific unit.
Napoleon’s North American Rogue 365 manual specifies a QCC1 connection for applicable propane models. It instructs the user to keep the regulator hose kink-free, insert the regulator connection into the cylinder valve, and tighten it clockwise by hand rather than with tools.
Make sure every burner control is OFF before opening the supply.
Open the cylinder valve slowly.
The manual also specifies that cart models are designed around a 20 lb propane cylinder for the North American configuration described in that documentation.
Again, do not apply that specification automatically to a grill sold under a different regional gas standard.
Napoleon 365SB Assembly Instructions Step 12: Perform the Leak Test Before Lighting
This is mandatory safety work.
Napoleon says a leak test should be completed before initial use and whenever gas components are replaced or serviced. Its manual also specifies recurring testing and testing when the propane cylinder is connected.
Keep all burner controls OFF.
With the gas supply turned on as directed by the manual, apply the prescribed soap-and-water leak-test solution to relevant joints and connections.
Never test for a gas leak with an open flame.
Napoleon states that bubbling indicates a leak. If one appears, the connection needs to be corrected according to the manual. If the leak cannot be stopped, shut off the supply and do not operate the grill until it has been inspected by an appropriate qualified gas professional or dealer/service provider.
A grill can look flawless and still have an unsafe connection. That is why the leak check is arguably the single most important stage of the Napoleon 365SB assembly instructions.
Step 13: Complete a Two-Minute Mechanical Inspection
Do one full walk-around before lighting anything.
This final check catches loose hardware and overlooked packaging surprisingly often.
Confirm:
- Structural fasteners are snug.
- The cabinet stands squarely.
- Casters or wheels are fully seated.
- The door opens without excessive rubbing.
- Both side shelves are secure.
- The range-burner grate is stable.
- The side-burner lid operates freely.
- The main gas hose is clear of hot surfaces.
- The hose does not run beneath the drip pan.
- The drip pan slides freely.
- Sear plates are positioned correctly.
- Cooking grids and warming rack are stable.
- No cardboard, plastic, zip ties, or packing blocks remain inside the grill.
Treat this inspection as part of the Napoleon 365SB assembly instructions rather than optional tidying.
First Startup After Following Napoleon 365SB Assembly Instructions
Move the assembled grill to an appropriate outdoor position before ignition.
Napoleon states that this gas grill is for outdoor use in a well-ventilated area and must not be operated inside a building, garage, screened porch, gazebo, or other enclosed space. The North American Rogue 365 documentation specifies clearances of 18 inches or 460 mm at the rear and 7 inches or 180 mm at the sides from combustible materials. Check the manual for your exact model because regional requirements can differ.
Follow Napoleon’s lighting procedure rather than improvising one.
The manufacturer’s manual also describes an initial burn-in. For the Rogue documentation reviewed here, Napoleon directs users to operate the main burners on high for approximately 30 minutes during initial lighting to burn off temporary manufacturing paints and lubricants responsible for the initial odor.
The range side burner deserves its own precaution. Do not close its lid while the burner is operating or still hot. Napoleon also states that the flame side-burner grate is designed for cookware rather than placing food directly on the grate.
Common Napoleon 365SB Assembly Instructions Mistakes
Tightening the Cabinet Too Soon
This is probably the easiest mistake to avoid.
If you completely tighten the first panel before fitting the other three, small alignment differences accumulate. You may end up fighting the final screw holes or wondering why the door hangs crooked.
Start the hardware loosely. Square the frame. Then tighten it.
Letting the Hose Pass Under the Drip Pan
This is not simply an untidy installation.
Napoleon explicitly warns against routing the hose under the drip pan and requires clearance between the supply hose and high-temperature surfaces.
Inspect the hose after the firebox and grease-management pieces are installed.
Forcing the Side-Burner Connection
A fitting that looks almost aligned may actually indicate that the burner or shelf has been installed incorrectly.
Stop and recheck the components.
Do not use force to compensate for incorrect positioning. The Napoleon 365SB assembly instructions should result in correctly aligned factory parts rather than modified ones.
Mixing Propane and Natural-Gas Hardware
Similar appearance does not mean identical function.
Fuel orifices, regulators, fittings, and supply requirements can differ. The official documentation lists configuration-specific gas components.
Use the parts specified for your exact model and fuel.
Forgetting the Hose Retaining Clip
On applicable propane versions, the supplied hose clip helps maintain the intended routing. Napoleon specifically illustrates clipping the hose to the side panel.
Do not leave it in the hardware bag because the grill already seems finished.
Skipping the Leak Test
A factory-tested grill still needs the user-side connections checked after assembly and fuel connection.
That requirement is explicit in Napoleon’s operating documentation.
How Long Do Napoleon 365SB Assembly Instructions Take to Complete?
For a careful first-time owner, setting aside roughly 60 to 120 minutes is sensible. Actual time varies with production version, how much of the unit arrives preassembled, tool familiarity, and whether another person is available.
Do not turn assembly into a race.
The biggest time-saving habits are simple:
- Sort the hardware first.
- Keep parts grouped by assembly stage.
- Leave the cart slightly loose until aligned.
- Use a helper for the grill head.
- Test folding shelves before final tightening.
- Inspect the hose before installing every interior component.
- Complete the leak test before first ignition.
Ten deliberate minutes around the side burner and hose can save half an hour of taking parts apart later.
FAQ About Napoleon 365SB Assembly Instructions
1. What tools do I need to assemble a Napoleon Rogue 365SB?
Napoleon’s 365SB quick assembly documentation calls out a 3/8-inch or 10 mm tool, and the grill uses various supplied screws and fasteners. Keep the tool and hardware diagrams for your exact production version beside you rather than relying entirely on a generic tool list.
Work gloves and safety glasses are also a smart choice. Napoleon specifically recommends them during unpacking and assembly because metal edges can be sharp.
2. Can one person assemble a Napoleon 365SB?
A single person can handle many of the cart, door, and shelf stages. The grill head is a different matter.
Using two people is the safer and more controlled approach for lowering the main body onto the completed cabinet. Following the Napoleon 365SB assembly instructions with a helper also makes it easier to see whether a hose or wire is becoming trapped while the grill head is positioned.
3. Where should the propane hose run on the Napoleon 365SB?
Keep it away from hot surfaces and do not route it underneath the drip pan.
Napoleon’s documentation also shows a hose-retainer clip for applicable configurations. Once the route is established, slide the drip pan through its entire range and make sure it cannot touch or abrade the hose.
4. Does a brand-new Napoleon grill really need a leak test?
Yes.
Napoleon requires leak testing before initial use and specifies additional testing after gas-system servicing or replacement. The manufacturer expressly warns never to use an open flame when checking for a leak.
If a leak cannot be corrected, shut off the fuel supply and do not operate the appliance until the problem has been professionally resolved.
5. Why won’t my Napoleon 365SB side burner light after assembly?
Start by checking the assembly before assuming the ignition system has failed.
Confirm that the burner is properly seated, the gas connection is aligned, the ignition lead is attached as intended, and the supply hose has not been kinked. Then use the lighting sequence prescribed for the grill.
The side-burner cover needs to be open when lighting and must remain open while the burner is operating or hot.
If you smell gas, stop trying to ignite the burner. Shut off the supply and follow the manufacturer’s gas-safety procedure.
Final Check: Napoleon 365SB Assembly Instructions
Good Napoleon 365SB assembly instructions should give you more than a grill that simply looks finished. The goal is a square cart, smoothly operating door, stable shelves, correctly positioned side burner, unobstructed grease system, safe hose route, properly installed cooking components, and fuel connections that pass the required leak test.
Build the base first. Keep the cart loose until it is square. Use help when positioning the grill head. Spend extra time aligning the range burner. Inspect every hose from below before gas is connected.
Then perform the leak test.
Once those checks pass, follow the official lighting and initial burn-in procedure supplied with your exact Rogue 365SB. Keep Napoleon’s model-specific manual and quick assembly diagrams with the grill for future maintenance, cylinder changes, troubleshooting, and replacement-part identification.